Keeping WordPress secure means keeping on top of PHP, plugins, themes, and the server itself. That is manageable with a handful of websites. Once you are responsible for more than that, it can become a bit of a headache.
But does every public website need a live WordPress installation behind it? For a simple landing page or a site that does not depend on constantly changing server-side content, there is another option: keep WordPress and Bricks for editing, then publish a static version.
Brick Static is built specifically for that workflow. It lets you export a Bricks website as a ZIP file or push it directly to GitHub. It also supports site search and ways to keep Bricks forms working, so going static does not automatically mean giving up those features.
What You'll Learn
- Brick Static exports Bricks websites as ZIP files or pushes them directly to GitHub.
- Site checks and export logs help distinguish informational notices from resources that need fixing.
- Fine-grained GitHub tokens restrict export access to a selected repository with read and write permissions.
- Taking WordPress offline depends on whether the static site still uses it for live services.
Table of Contents
- Why Use a Static Version of Your Bricks Site?
- 1. Run the Site Checks Before Exporting
- 2. Configure the Site Addresses and Export Options
- 3. Export the Site as a ZIP File
- 4. Create a GitHub Repository for the Static Files
- 5. Create a Fine-Grained GitHub Access Token
- 6. Push the Static Export to GitHub
- ZIP or GitHub: Which Should You Use?
- Keep WordPress for Editing, Not Necessarily for Public Delivery
Why Use a Static Version of Your Bricks Site?
The attraction here is keeping the flexibility of WordPress without necessarily exposing the whole WordPress system on your public site.
You still build and update your pages in Bricks. When you are ready, you export the site and deploy the resulting files to your hosting. The public site serves that exported version rather than relying on WordPress to generate its pages.
The important distinction is that you are separating editing from publishing. WordPress becomes the place you make changes, while the static export becomes the version people access.
That can reduce exposure to PHP and plugin vulnerabilities on the public-facing site. It does not mean security, updates, or backups stop mattering altogether. Any WordPress installation you retain still needs looking after, particularly if it remains available to process forms.
Brick Static comes from the same developer behind Bricks Migration Engine and Bricks Health. I have no affiliation with the product and was not asked to cover it. What interests me is how straightforward it makes this particular Bricks workflow.
Check Whether Static Publishing Fits Your Site
My example is a very simple landing page site. It has no forms and does not need search, which makes it a straightforward starting point.
A site that depends on PHP running whenever someone requests a page needs more consideration. PHP-generated output can be captured during an export, but it will not continue executing on a static host. If that output needs to change independently of your publishing process, a static copy may not be the right fit.
Forms and search deserve a separate check. Brick Static provides options for both, but you should review the documentation on the Brick Static website for the setup that matches your site. The workflow below focuses on checking, exporting, and connecting GitHub rather than configuring every form or search option.
1. Run the Site Checks Before Exporting
With the plugin installed, open Brick Static and choose Open the export. You can also go directly into its settings, but the export screen is a useful place to start because it checks the site for potential problems.
Use Check again to refresh the results. Brick Static examines the pages and content, then reports findings that may affect the export.
Do not assume every finding is an error you have to fix. Some explain how the exporter handles a particular feature, and others simply flag something you should understand before proceeding.
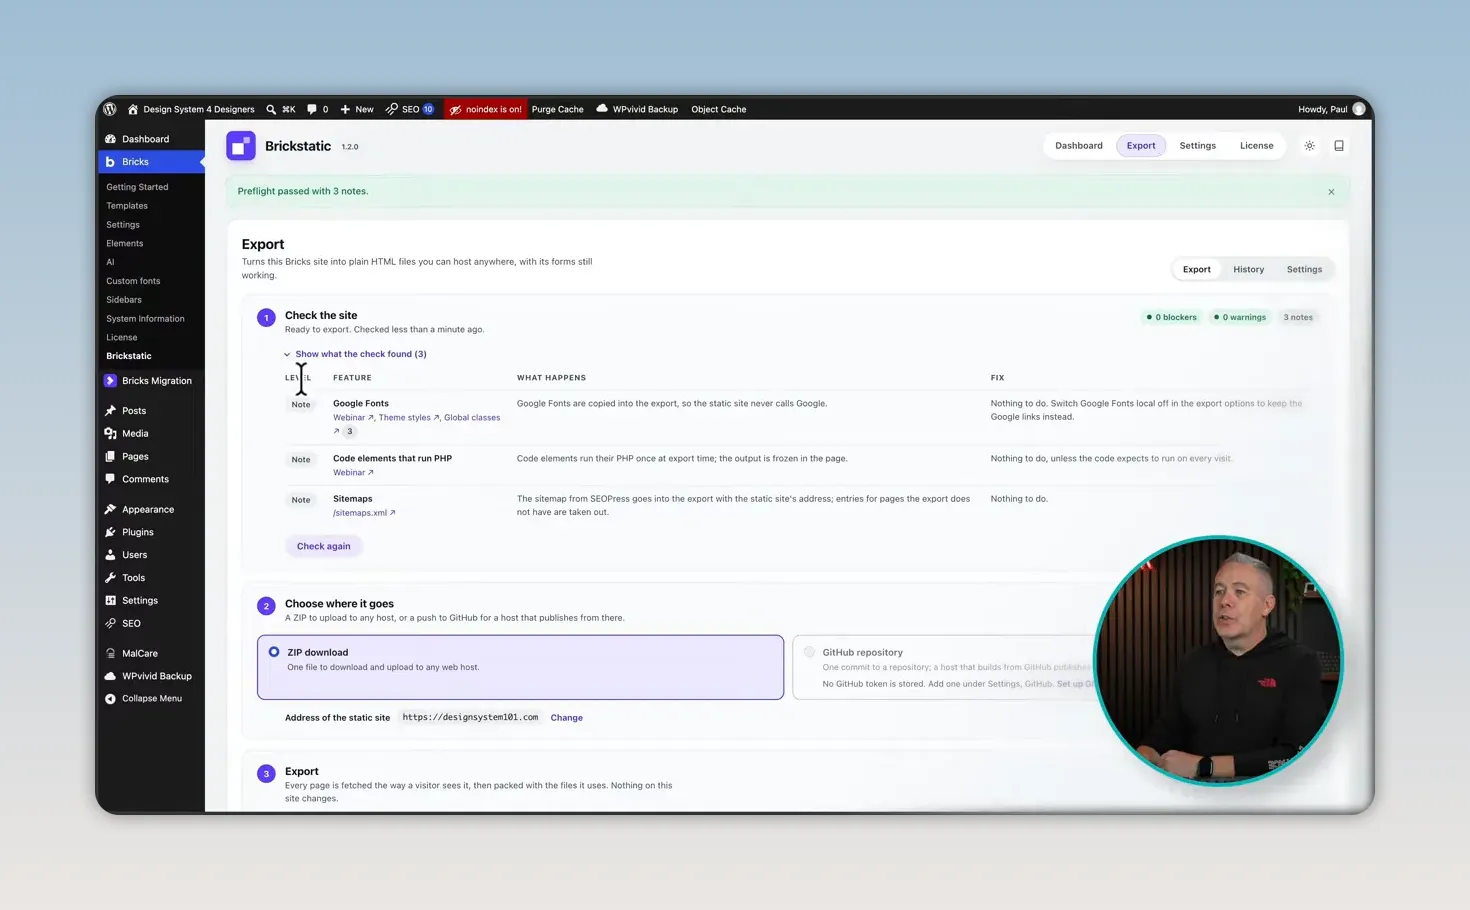
In my test, the checks included:
- Google Fonts: Fonts are copied into the export so the static site does not need to request them from Google. That removes those external font requests, which is useful from a privacy perspective, although it is not a complete GDPR compliance solution.
- PHP code elements: These need reviewing to establish whether their exported output is sufficient or whether they depend on ongoing PHP execution.
- Sitemaps: The checker reports how these are handled and whether anything needs attention.
Fix anything that genuinely needs fixing, run the checks again, and continue once you are happy with the results. The point is to understand what is being exported, not simply to dismiss every notice.
2. Configure the Site Addresses and Export Options
Set the Address of the Static Site
Your WordPress address and your public static-site address may be different. That is the case in my example because the WordPress copy is on a staging site.
In the export screen, check the address shown for the static site. Use Change to open the relevant settings and enter the destination address.
The address settings also include:
- The WordPress address used for forms.
- Any additional static origins you need to allow.
If you are using WordPress to process Bricks form submissions, the form address needs to point to the installation handling them. Alternatively, you can use an external form service rather than relying on WordPress.
That choice affects whether you can take WordPress offline later. A static page cannot send submissions to a WordPress installation that is unavailable.
Choose What Goes Into the Export
The settings let you control features such as Google Fonts, site search, redirects, and author archives. Enable what the site needs and disable what it does not.
For my landing page, there is no reason to include search or configure forms. Your site may be different. The useful thing is that these are choices rather than features you have to include regardless.
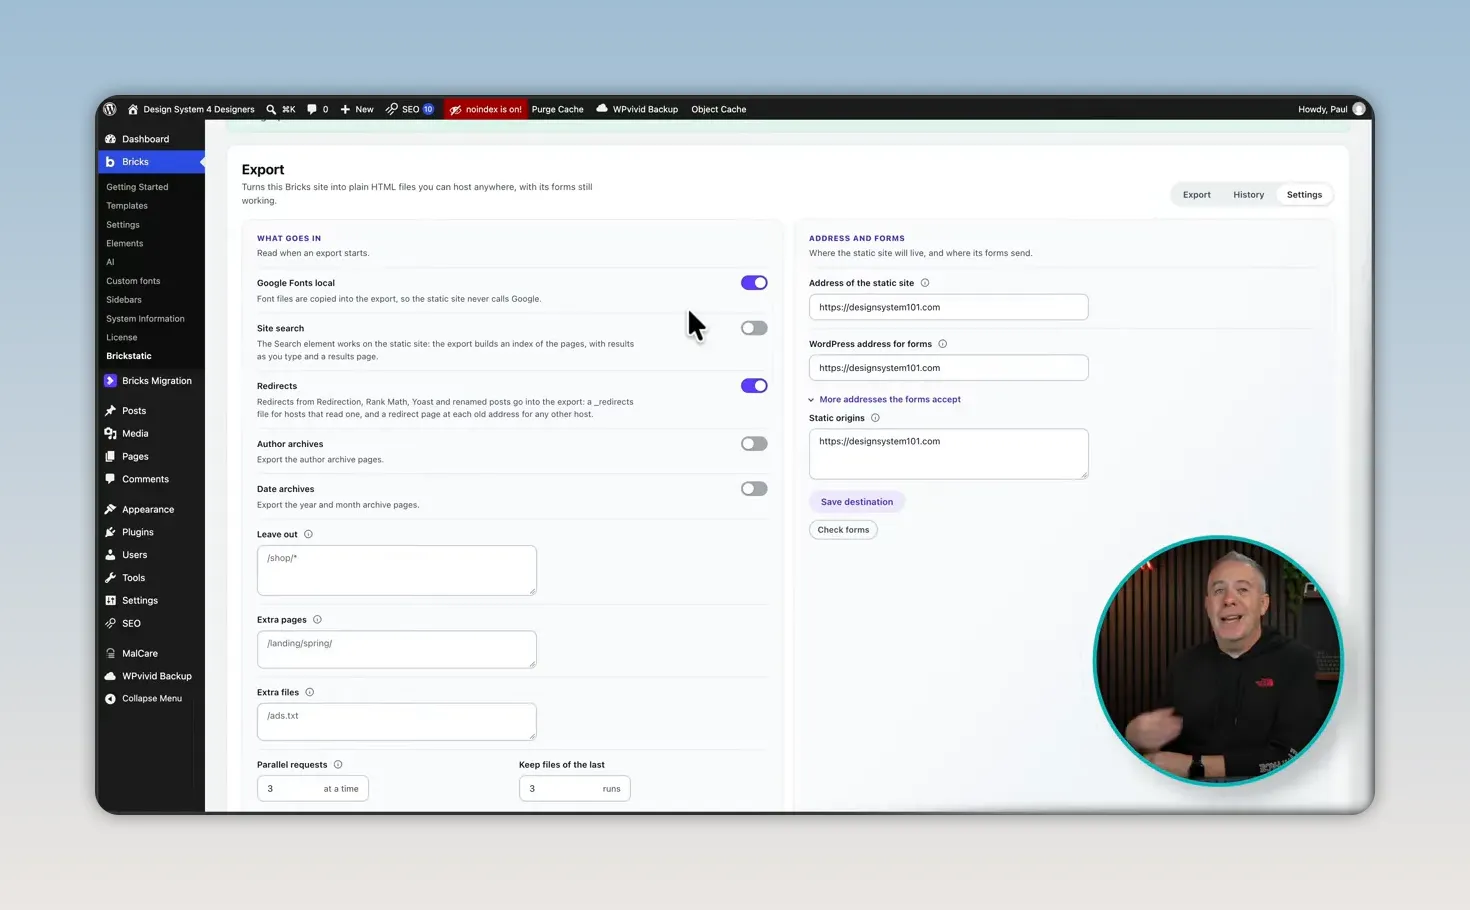
You can also exclude particular pages and specify additional files. Review those settings alongside the feature switches so the export contains the content you actually intend to publish.
Adjust Requests and Retained Exports
There are controls for parallel requests and how many recent exports to keep.
If the WordPress copy is on shared hosting, keep the number of parallel requests fairly low. If exports encounter timeouts, reducing the number of simultaneous requests is a sensible adjustment to try.
Retaining previous exports gives you access to earlier downloadable copies. Choose a retention setting that suits the way you manage the site.
If you have configured forms, use the available form test to check the setup. Save your settings before returning to the export screen.
3. Export the Site as a ZIP File
The ZIP option is the simplest route. You do not need GitHub or any version-control setup to use it.
- Open the Brick Static export screen.
- Choose ZIP download as the destination.
- Confirm the static-site address is correct.
- Select Start export and start the process.
- Review the result and download the export.
My example is a small site, so there is not much to process. Once the export finishes, Brick Static provides a download and access to the export history.
You can then deploy the files to suitable hosting, upload them using FTP, or use a static-hosting service such as Cloudflare. If you want a manual upload workflow, Cloudflare documents its options in the Pages Direct Upload guide.
Read the Log, Not Just the Status
My first export completed with one failed item. That sounds more worrying than it actually was.
Opening Show the log revealed a 404 response for the favicon. The site did not have a favicon configured, so the exporter could not retrieve it.
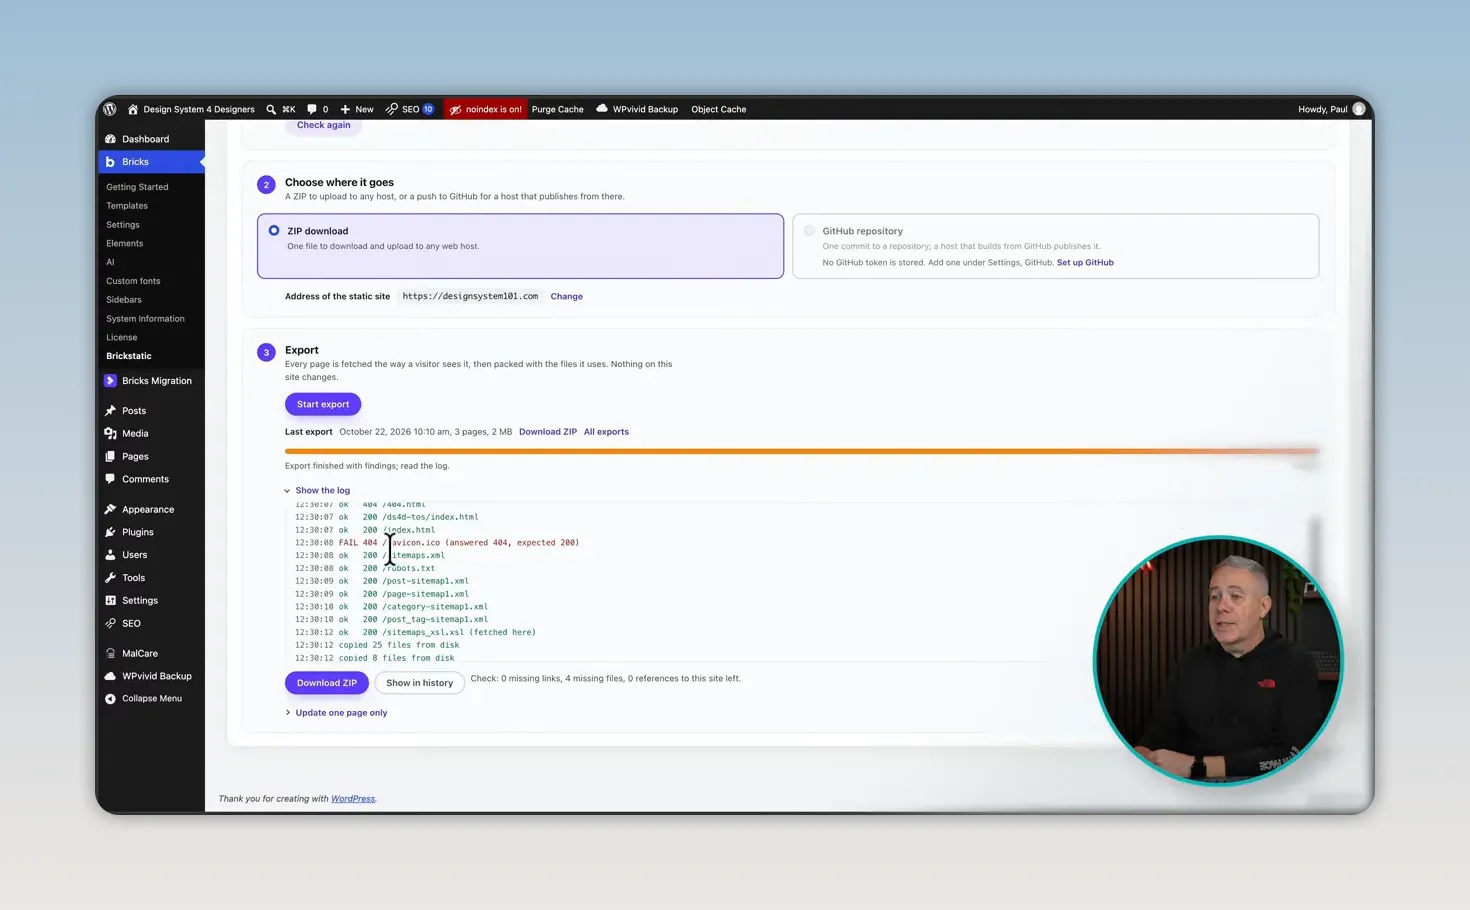
In this case, the fix is to upload the icon and configure it as the site favicon, then export again. Uploading a file alone is not enough if the site still points to a missing favicon address.
The lesson is simple: a completed export can still have findings worth investigating. A missing favicon is very different from a missing page or stylesheet. Read the individual log entries before deciding whether the export is ready to deploy.
Use Show history to see the saved exports and download an earlier version when needed. For a straightforward site, this ZIP workflow may be all you need.
4. Create a GitHub Repository for the Static Files
GitHub adds another option: keeping the exported site in a repository, with version history and the ability to connect it to compatible hosting services.
A repository is simply the place where the files and their change history live. You can create a free GitHub account for this workflow without entering payment details.
Once signed in:
- Select New to create a repository.
- Give it a name. I used brickstatic.
- Set its visibility to Private if you do not want the repository contents publicly accessible.
- Leave the README and other initialization options unchanged for this example.
- Select Create repository.
You now have an empty repository ready to receive the export.
Enter the Repository Details in Brick Static
Return to Brick Static settings and find the GitHub section.
The repository field expects the owner and repository name in owner/repository format, not the entire GitHub URL. You can get that part from the repository address in your browser.
For this setup:
- Repository: Enter your GitHub account or organization name followed by the repository name.
- Branch: Use main.
- Folder in the repository: Leave it at the default to use the repository root.
- Token: Add the personal access token created in the next step.
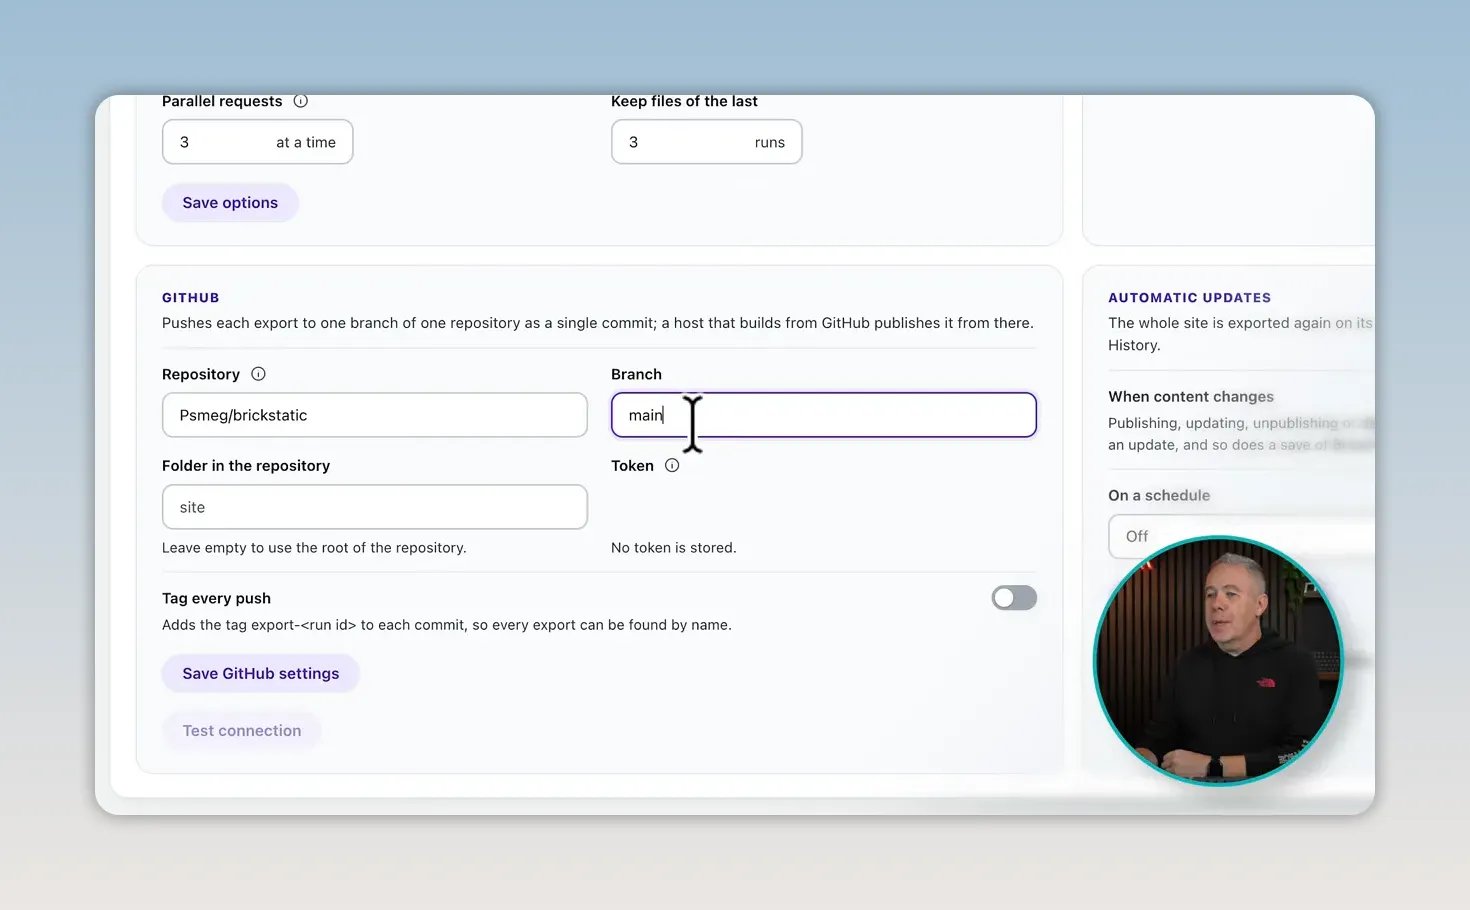
Branches allow you to maintain different lines of changes within a repository. We do not need anything complicated here. The main branch is simply where this exported site will go.
5. Create a Fine-Grained GitHub Access Token
Brick Static needs permission to write files to the repository. A fine-grained personal access token lets you restrict that access to the specific repository used for this site.
In GitHub, open your profile menu and follow:
Settings → Developer settings → Personal access tokens → Fine-grained tokens
Create a new token and configure it as follows:
- Give it a recognizable name. I used Brick Static Tutorial.
- Choose an expiration. I used 30 days for the example. A shorter lifetime limits how long the credential remains valid, but you will need to replace it when it expires.
- Restrict repository access. Choose Only select repositories and select the repository you just created.
- Add the Contents permission. Change its access level from read-only to Read and write.
- Generate the token. Complete any confirmation GitHub requests.
For additional guidance on those controls, GitHub provides documentation on managing personal access tokens.
The generated token is only displayed once. Copy it immediately and treat it as a password. If you need to retain a copy, use secure credential storage rather than putting it in the repository.
Back in Brick Static, click into the token field and paste it. In the interface I tested, the field was not especially obvious, but it was editable.
Save the Settings and Test the Connection
Before saving, you can enable Tag every push. This uses the export run ID to make individual exports identifiable by name in GitHub. It is useful if you plan to publish repeatedly and want to keep track of the different exported versions.
Select Save GitHub settings, then use Test connection.
A successful result confirms the repository connection and whether pushing is allowed. In my test, it also reported the repository visibility, connection timing, and commit count.
Once that test passes, the connection is ready to use.
6. Push the Static Export to GitHub
Return to the export screen. This time, select GitHub repository instead of the ZIP destination, then start the export.
Brick Static performs the export and pushes the resulting files into the configured repository. When it finishes, review the log just as you would for a ZIP export.
Then refresh the repository in GitHub. The previously empty repository should now contain the static site's files and folder structure.
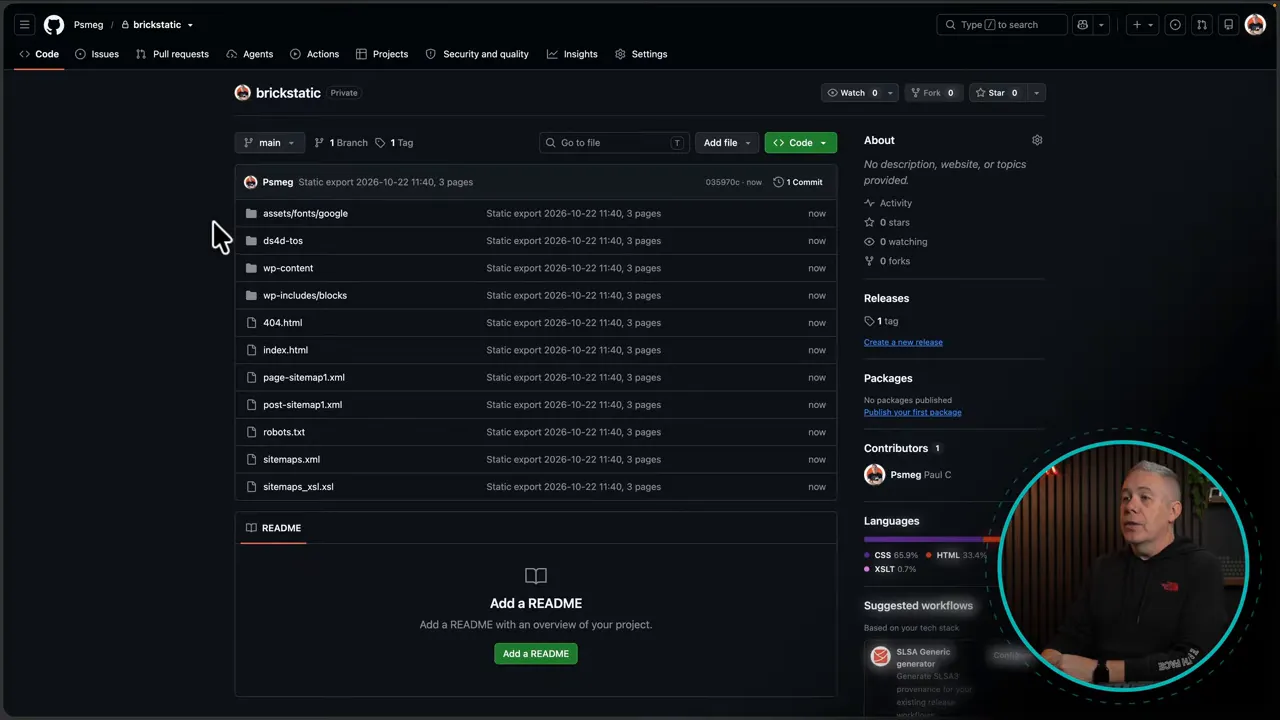
From here, you can connect the repository to a hosting service that supports GitHub deployment, such as Cloudflare or an appropriate xCloud setup. The host handles the deployment side once that integration is configured.
That is an important distinction: pushing to GitHub stores the files, but it is not the same thing as configuring your live hosting. Brick Static supplies the export; your hosting workflow determines how those files become the public site.
ZIP or GitHub: Which Should You Use?
Both routes give you a static version of the same Bricks site. The difference is how you want to manage the files afterward.
- Choose ZIP for simplicity. Export, download, and upload the files using your preferred method. It is a good fit when you are happy to manage deployment manually.
- Choose GitHub for version history and deployment integrations. Keep successive changes in a repository and connect that repository to a compatible hosting service.
There is no need to make the process more involved than your site requires. If downloading a ZIP and uploading it works for you, that is a perfectly reasonable workflow.
Keep WordPress for Editing, Not Necessarily for Public Delivery
Once the static site is deployed, your update process becomes straightforward: make changes in WordPress and Bricks, export again, then publish the new version.
If the public site does not depend on the WordPress copy for forms or other live services, you could take that copy offline between updates. Bring it back when you need to edit, make your changes, export, deploy, and take it offline again.
If forms still submit to WordPress, that installation needs to remain available. Going static only gives you the separation your actual setup allows.
That is why I think static publishing is worth understanding. Not every website needs all of WordPress running behind its public pages all the time. Brick Static gives Bricks users a relatively simple way to keep the editing experience they know while choosing a different way to deliver the finished site.


