Mortar is a free utility plugin for Bricks Builder that makes the editor a little more useful. It adds shortcuts, clearer structure-panel information, class-management tools, and a few handy CSS features without trying to become an enormous toolkit.
Think of it as a smaller, more focused alternative to Advanced Themer. If you’ve used Advanced Themer before, quite a few of these ideas will feel familiar. If you haven’t, some of these little improvements could make a surprisingly big difference to your everyday workflow.
For me, the appeal is straightforward: less clicking, less repetitive cleanup, and more time actually building the page.
Key Takeaways
- Mortar adds focused, free workflow enhancements directly inside the Bricks Builder editor.
- BEM generation and ID-to-class export reduce repetitive naming and styling cleanup.
- Structure labels, style indicators, and customizable shortcuts make everyday page building easier.
- Advanced Themer remains the broader option if you need a more comprehensive toolkit.
Table of Contents
- Everything Lives Inside Bricks Builder
- Apply Consistent Naming With the BEM Generator
- Make the Structure Panel Easier to Read
- Insert Elements Faster With Custom Shortcuts
- Reduce Class-Management Cleanup
- Reuse CSS With Recipes
- Write CSS Variables Faster With Smart Values
- Customize the Bricks Editor With Themes
- Mortar or Advanced Themer?
- Sponsor: SEOPress
Everything Lives Inside Bricks Builder
Once Mortar is installed, there’s no separate settings page to hunt down in the WordPress dashboard. Everything is handled inside Bricks Builder.
Open a page in the editor and you’ll notice changes straight away, including style indicators in the structure panel and shortcut icons down the right-hand side. A Mortar icon in the top-right toolbar opens its settings, where you can configure the individual enhancements.
That’s an important distinction. This is primarily a tool for improving how you work inside Bricks, rather than adding another collection of design elements.
Apply Consistent Naming With the BEM Generator
If you use BEM naming and occasionally forget to name everything as you build, you’ll appreciate this one. I certainly do.
BEM stands for Block, Element, Modifier. It gives you a consistent way to name a component, its child elements, and its variations. The BEM naming guide is a useful reference if the convention is new to you.
Mortar’s BEM generator works with an existing element structure, so you don’t have to get all your naming sorted before you start designing.
- Select the parent element you want to work with.
- Click the BEM icon to open the naming interface.
- Replace the suggested block name with something meaningful, such as
hero-main. - Review the generated names for the child elements.
- Uncheck anything you don’t want included.
- Add modifiers where needed, then click Apply.
Changing the main name updates the proposed names beneath it. You can then decide exactly which parts of the structure should receive those classes.
It’s a useful way to tidy up something you’ve already built, rather than going back through every heading, image, and container individually. Pretty nifty.
Make the Structure Panel Easier to Read
Mortar adds a few improvements to the structure panel that help you understand a page at a glance.
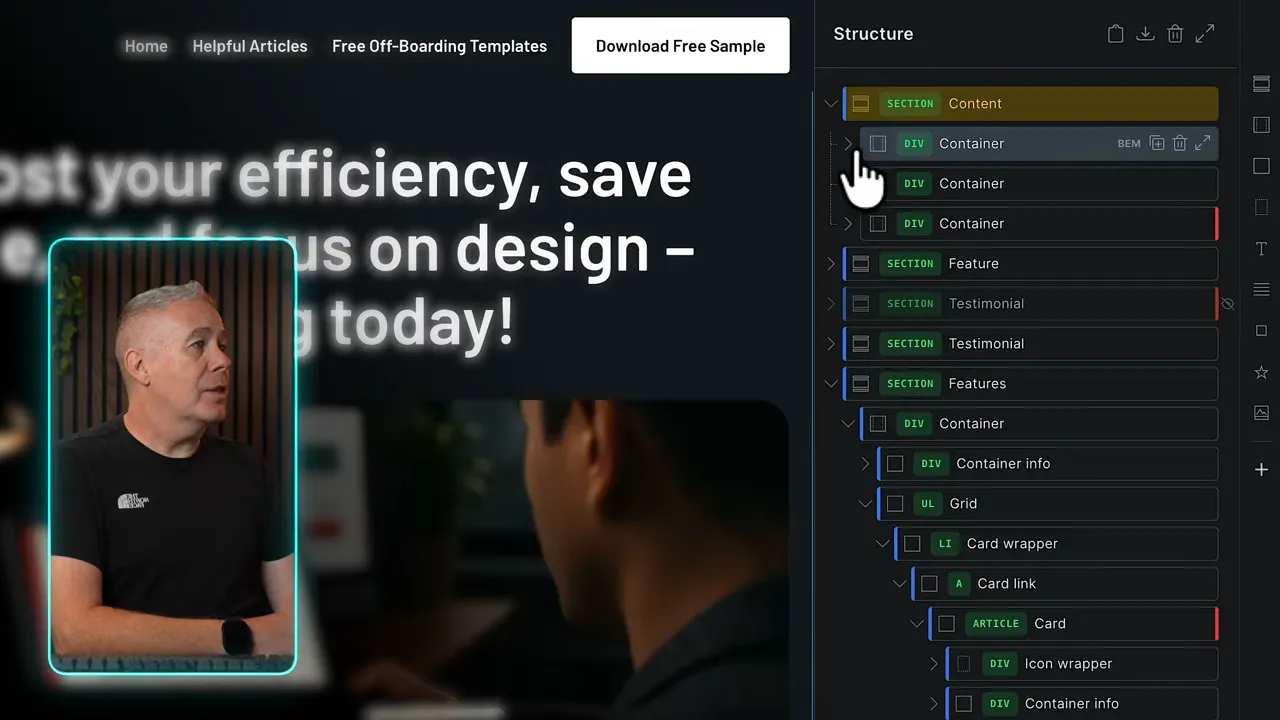
See Element Types Alongside Your Labels
A custom label tells you what an element is for, but it doesn’t always tell you what the element actually is. Mortar’s HTML/type labels make that clearer.
You can quickly distinguish a section from a div, identify an H1, and see where images and other component pieces sit within the structure. That’s particularly helpful when you’ve renamed elements to describe their purpose.
Expand Individual Branches
Instead of relying only on an expand-all control, Mortar gives you an expand option for individual elements.
Open one section and reveal its containers and nested elements without expanding the rest of the page. Close it again when you’re finished. It’s a simple change, but it makes navigating a busy structure much more manageable.
Spot ID-Level Styling
The red indicators tell you where ID-level styling exists. An indicator on a parent can alert you to styling somewhere within that branch, while the red line beside an individual element helps you locate it.
This can mean an element is styled entirely at the ID level, or that its styling is split between an ID and a class.
A red indicator is not an error message. There’s nothing inherently wrong with styling an ID. If something only appears once on a page or across the entire site, creating a reusable class for it may not serve much purpose.
Treat these indicators as information, not a demand to turn everything into a class.
Insert Elements Faster With Custom Shortcuts
The shortcut toolbar is one of those features that becomes difficult to give up once you get used to it.
Rather than moving over to the left-hand element panel and then back to the structure panel, you can insert common elements using shortcuts beside the structure itself.
The toolbar is customizable:
- Use the plus control to add shortcuts for elements you use regularly.
- Remove elements you rarely need.
- Add them back whenever you want.
- Reorder the shortcuts to suit your own building habits.
For example, you might add a section, expand it, and then insert text and an image from the same area of the interface. Rich text and text links are other options you can include.
There’s no complicated trick here. You’re simply reducing the back-and-forth that happens dozens of times while building a page. If you’ve never used a similar toolbar in Advanced Themer, this feature alone could be enough to make Mortar worthwhile.
Reduce Class-Management Cleanup
Two of Mortar’s class features tackle slightly different problems: keeping the correct class selected while you work, and rescuing styles you’ve already applied at the ID level.
Automatically Select New or Renamed Classes
With auto-select classes enabled, creating or renaming a class automatically selects it for styling.
That saves an extra click and lets you carry on working immediately. It’s a small convenience, but exactly the sort of thing a utility plugin should do.
Export ID Styles to a Class
This is the more substantial time-saver.
You start designing a section, add some layout settings and spacing, and only afterwards realize it should have been a reusable class. Creating a class at that point doesn’t automatically transfer the existing ID styles into it.
Normally, that leaves you with a bit of tedious cleanup. Mortar provides an Export ID Styles to Class command to handle that transfer.
- Select the element containing the ID-level styles.
- Create or select the class you want those styles associated with.
- Open the element’s Bricks menu using the small B icon.
- Choose Export ID Styles to Class.
- Check the class styling and confirm the styles are no longer left on the ID.
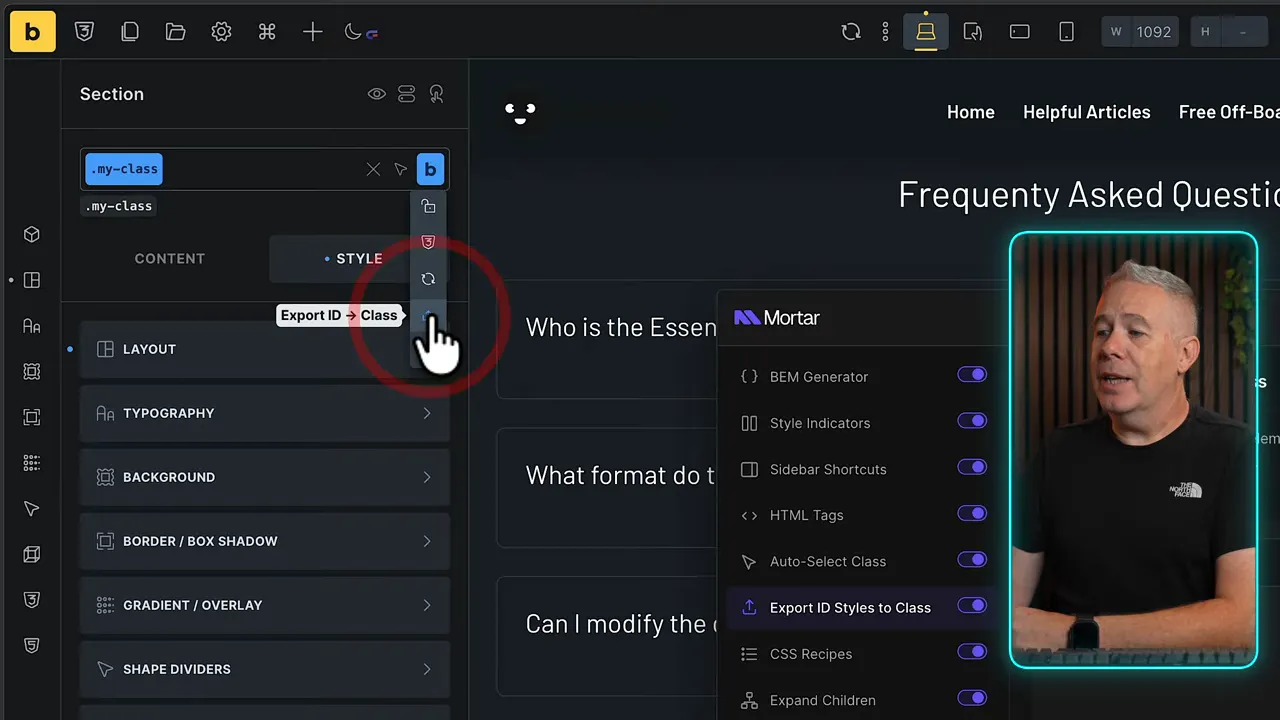
In the example, the styling indicators change to show that the settings are now associated with the class.
This fits the way design work often happens. Sometimes you’re just putting things on the page and figuring out the layout. A tool that helps organize those decisions afterwards is genuinely useful.
Reuse CSS With Recipes
CSS recipes let you save a collection of CSS and insert it again using a short reference beginning with the @ symbol.
The idea is simple: save a block of CSS as a named recipe, then use its reference in the CSS editor. Mortar replaces that reference with the recipe’s full CSS.
A clickable-parent recipe is one example shown in the settings. Rather than repeatedly finding and pasting that collection of rules, you can keep it available through a memorable name.
Think of recipes as reusable snippets that expand into CSS, rather than another piece of CSS syntax you need to maintain in the finished stylesheet.
I used this sort of feature quite a lot with Advanced Themer. I haven’t set up a recipe for this example, so this isn’t a worked demonstration, but the purpose is straightforward: stop retyping the same blocks of CSS.
Write CSS Variables Faster With Smart Values
Smart Values handles another small but repetitive job: formatting CSS variable references.
Normally, using a custom property as a value means wrapping its name in var(). With Mortar’s Smart Values enabled, you can type the variable name into a CSS declaration and finish it with a semicolon. Mortar adds the variable wrapper for you.
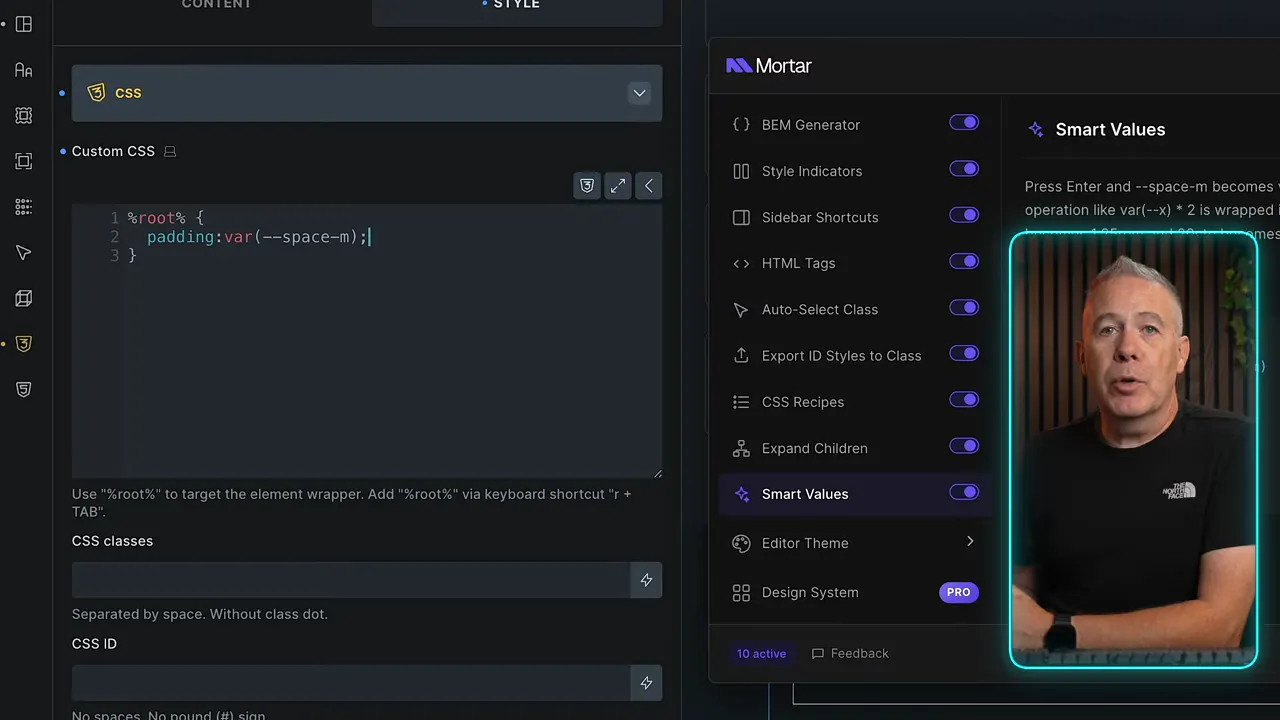
The demonstration uses a padding declaration. Once the semicolon is entered, the shorthand expands into the full variable reference.
You’re still using ordinary CSS custom properties. Mortar is just saving some typing. If you need a refresher on the underlying syntax, MDN’s explanation of the var() function covers how those references work.
Customize the Bricks Editor With Themes
Mortar also includes optional editor themes. These change the appearance of the Bricks interface, with presets including Paper, Dracula, Carbon, and Midnight.
You can choose a preset and apply it, customize the colors yourself, or add custom CSS for further tweaks.
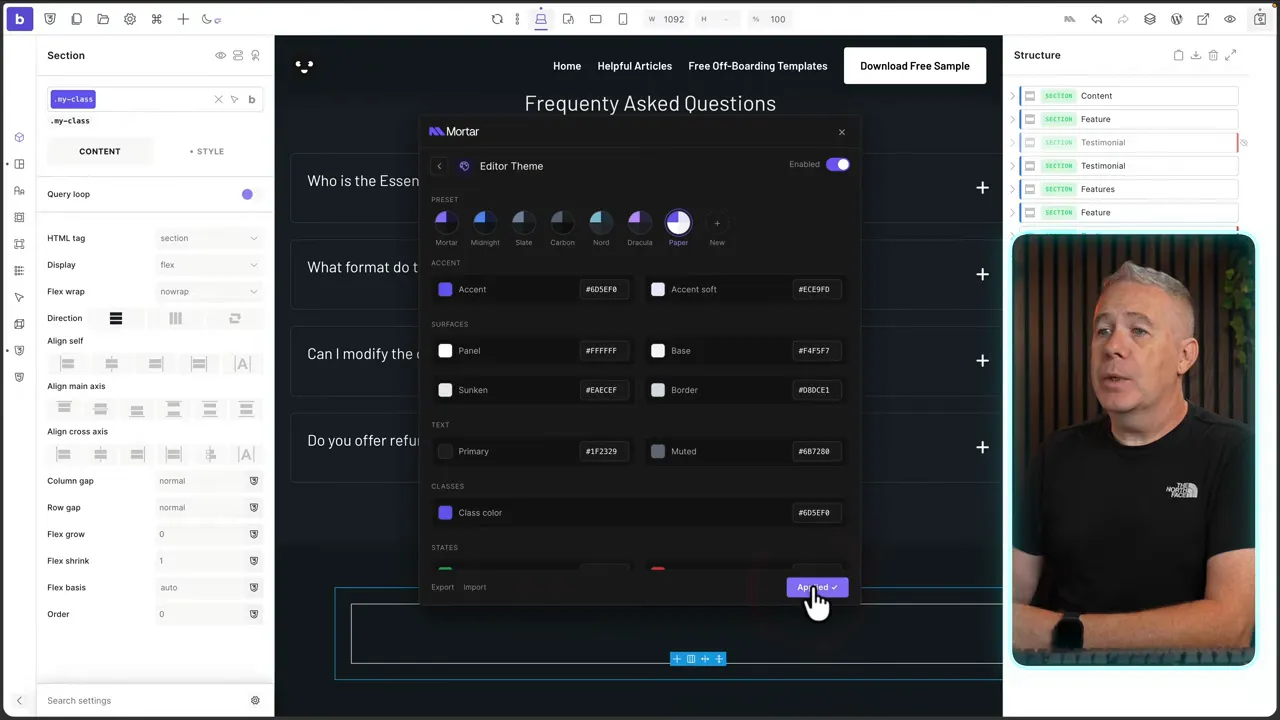
That could be useful if you want company colors in the editor, or you’re handing a project over to a client and want the interface to reflect their branding.
Personally, editor themes aren’t the big attraction for me. The bright white Paper option certainly isn’t my preference. I’m more interested in the workflow tools, and I tend to leave this kind of customization disabled.
Still, the option is there if a different color scheme makes the editor more comfortable for you.
Mortar or Advanced Themer?
If you want a much broader collection of Bricks enhancements and more comprehensive controls, Advanced Themer is probably still the better fit.
Mortar’s strength is its narrower focus. It brings together useful interface tweaks, quicker element insertion, BEM naming, class cleanup, and CSS conveniences in a free plugin.
My main reasons to consider it would be:
- Faster building: customizable element shortcuts and per-element expansion.
- Clearer structure: element-type labels and ID-style indicators.
- Less remedial work: BEM generation and exporting ID styles to classes.
- Less repetitive typing: CSS recipes and Smart Values.
At the time I tested it, there were indications that a Pro or premium version might follow. I haven’t spoken to the developer, and I don’t know what that version would include, so I wouldn’t base a decision on possible future features.
As it stands, Mortar is a useful little toolkit for making Bricks Builder quicker and more pleasant to work in. It doesn’t need to do everything to earn its place.
Sponsor: SEOPress
SEOPress sponsors this review. Its version 10 offering focuses on reducing repetitive WordPress SEO administration. The free version allows compatible external AI agents to analyze content and manage essential SEO settings, while Pro adds an in-editor AI assistant, automation for redirects, schema, and image metadata, plus flexible AI provider options.
If that fits your workflow, the SEOPress website has the version details and current pricing.


